
The Ultimate Guide to Using the iOS Accessibility Inspector
The Ultimate Guide to Using the iOS Accessibility Inspector
What Is the iOS Accessibility Inspector and Why Does It Matter?
The accessibility inspector iOS developers rely on is a free, built in tool inside Xcode that lets you view, test, and audit the accessibility information your app exposes to assistive technologies like VoiceOver.
Quick answer: Here is what you need to know at a glance:
- What it is: A developer utility inside Xcode that displays accessibility data for every UI element in your app
- How to open it: Xcode > Open Developer Tool > Accessibility Inspector
- What it checks: Unlabeled elements, clipped text, poor color contrast, missing traits, and more
- Who it helps: Developers, QA testers, and designers who need to verify WCAG 2.2 compliance on iOS apps
- Works with: iOS Simulator and physical iOS devices
If your iOS app has buttons a screen reader cannot describe, text that disappears at larger font sizes, or colors that low vision users cannot read, you have an accessibility problem. And under the ADA, that problem can carry real legal risk.
The good news is that Apple ships a powerful diagnostic tool directly inside Xcode at no extra cost. The Accessibility Inspector lets you inspect every element on screen, run automated audits, simulate VoiceOver navigation, and test system accessibility settings, all without leaving your Mac.
Standard UIKit controls are accessible by default, but the moment you build custom views, use image assets as icons, or render text with a CATextLayer, you are on your own. That is exactly where the Accessibility Inspector earns its value.
I’m Matthew Post, co founder of WCAG Pros and a programmer with over 20 years of experience in web and mobile accessibility. In my work auditing apps for WCAG 2.2 compliance, the accessibility inspector iOS tool is one of the first things I recommend teams add to their development workflow. In the sections below, I will walk you through exactly how to use it.
Handy accessibility inspector ios terms:
Getting Started with the Accessibility Inspector iOS
Launching and configuring the accessibility inspector iOS tool is a straightforward process, but you must make sure your environment is set up correctly to get the most accurate results.
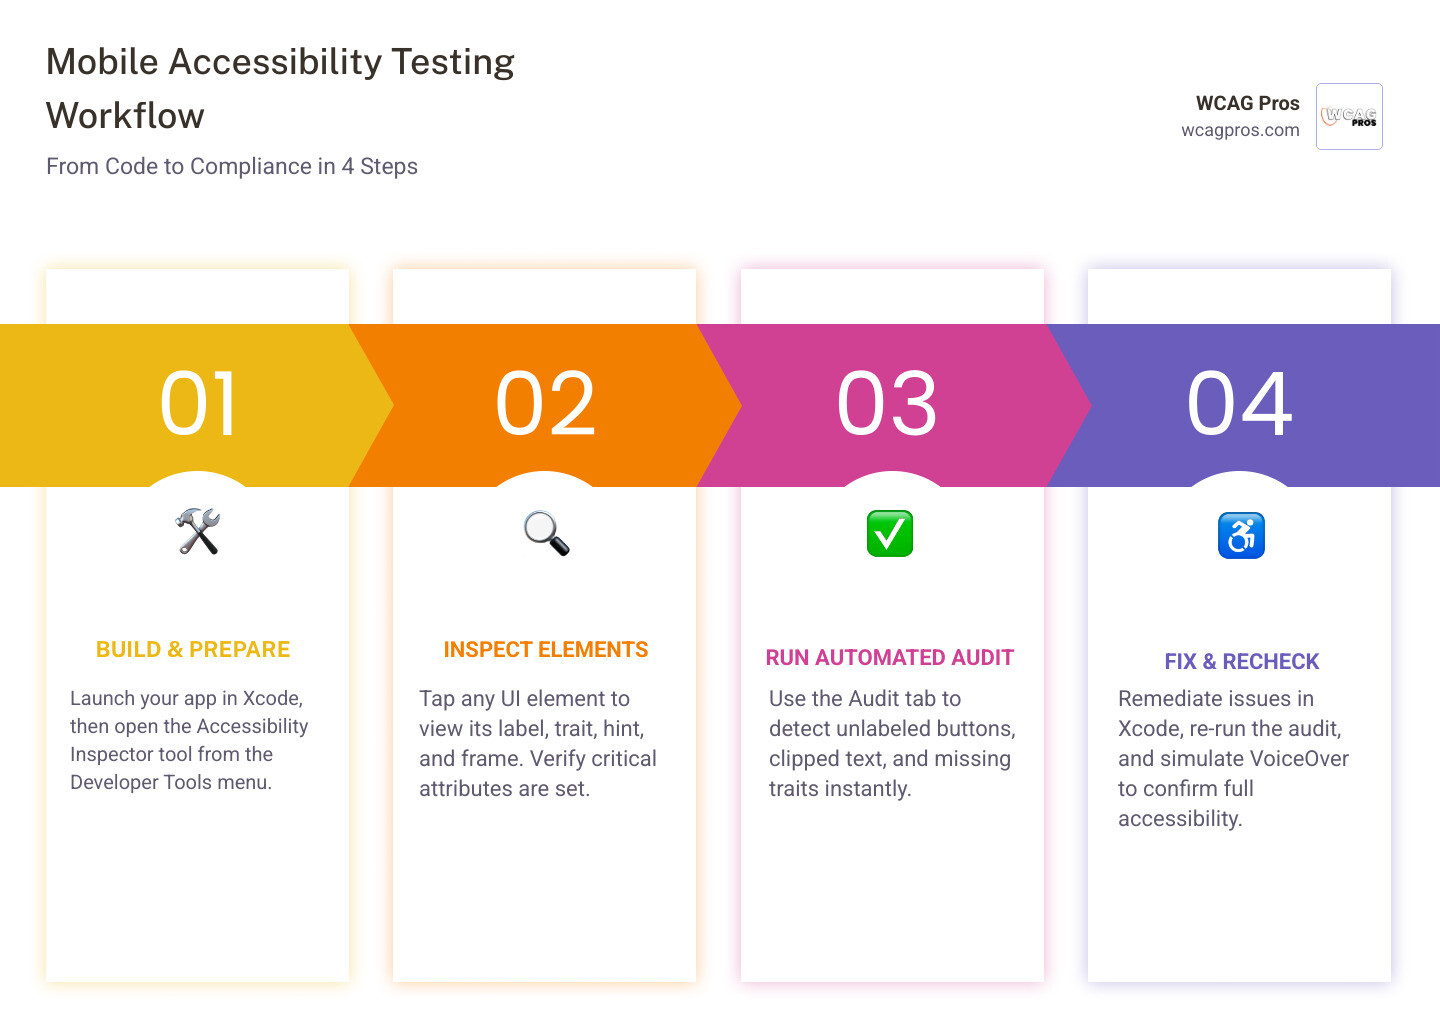
To open the tool on your Mac, you must first launch Xcode. Once Xcode is running, move your cursor to the macOS menu bar at the top of your screen. Click on Xcode, navigate down to Open Developer Tool, and select Accessibility Inspector from the slide out menu. You can also keep Xcode running in the background and use the standalone application if you prefer, but having Xcode open is highly recommended to ensure the tool functions properly.
Once the inspector window opens, your first task is target selection. In the top left corner of the inspector toolbar, you will find a dropdown menu. This menu allows you to choose which active process or device you want to inspect. You can target your Mac computer itself, any active iOS Simulator running on your machine, or a physical iOS device connected to your Mac via a USB cable.
If you want to test your app on the iOS Simulator, make sure you launch the simulator and open your target application before choosing the target in the inspector. Once you select the simulator process from the dropdown, the inspector will actively sync with the simulator screen.
For physical device testing, you must connect your iPhone or iPad to your Mac. You must also ensure that the application you want to test is a debuggable build or has its instrumentation flags enabled. Apple enforces strict security protocols that prevent external inspection tools from reading the view hierarchy of standard retail apps, so testing your own development builds is the best way to get full data access.
For more technical details on setting up your testing environment, you can check out the official Accessibility Inspector | Apple Developer Documentation.
Navigating the Three Main Tabs of the Inspector
The interface of the accessibility inspector iOS tool is organized into three primary tabs located on the right side of the utility window. Each tab serves a unique purpose in your digital accessibility testing workflow.
The first tab is the Inspector Tab, which acts as your primary manual debugging window. When you select the target icon in the toolbar and hover over or click any UI element in your app, the Inspector Tab displays the exact raw data that assistive technologies receive. This tab is perfect for verifying that individual buttons, text labels, and custom views are properly configured.
The second tab is the Audit Tab. This is where you can run automated checks on the active screen of your application. With a single click, the inspector scans your view hierarchy and flags issues like missing labels, poor contrast, and clipped text. It provides a list of warnings, explains why each issue is a problem, and suggests code-level fixes.
The third tab is the Settings Tab. This tab is an incredibly powerful tool for quick visual testing. Instead of digging through the settings app on your simulator or physical device, you can use this tab to toggle system level accessibility features on and off instantly. This allows you to see how your app adapts to user preferences in real time.
To understand how these tabs fit into a broader testing strategy, you can read our Practical Accessibility Testing Guide 2026.
Inspecting Element Attributes with the Accessibility Inspector iOS
When you use the Inspector Tab to examine a specific UI element, the tool breaks down the element into several core accessibility attributes. Understanding these attributes is essential for building a compliant user experience.
The first attribute is the Label. The label is a short, localized string that identifies the element. For example, a button with a plus icon should have a label like Add. It is vital that you do not include the control type in the label. If you name a button Add Button, VoiceOver will read it aloud as Add Button button, which is redundant and frustrating for the user.
The second attribute is the Trait. Traits describe the state, behavior, or usage of an element. The UI Accessibility programming interface defines several traits, such as Button, Link, Image, or Selected. By combining these traits, you tell the screen reader how the element behaves so the user knows they can interact with it.
The third attribute is the Hint. A hint provides additional context about what will happen when a user performs an action on the element. Hints are optional and should only be used when the result of an action is not obvious from the label alone. A good hint always starts with a third person singular verb, such as Adds a new account, and ends with a period.
The fourth attribute is the Frame. The frame defines the exact screen coordinates and physical dimensions of the element. This is crucial because it determines the touch target size. Under WCAG 2.2 guidelines, interactive elements should have a target size of at least 24 by 24 pixels, and Apple recommends a minimum touch target of 44 by 44 points to prevent accidental taps.
The fifth attribute is the Value. This attribute is used for elements that hold dynamic content, such as text fields, sliders, or progress bars. For example, a volume slider might have a label of Volume and a value of 80 percent.
If you are building custom views that do not inherit from standard UIKit controls, you must make sure that the isAccessibilityElement property is set to true in your code. If this property is false, the inspector and assistive technologies will completely ignore the element.
You can learn more about configuring these properties in the Accessibility for UIKit | Apple Developer Documentation.
Running Audits and Simulating VoiceOver in the Accessibility Inspector iOS
The Audit Tab is your best friend when you want to find low hanging fruit in your application. To use it, navigate to the screen you want to test in your simulator, open the Audit Tab in the inspector, and click the Run Audit button.
The tool will analyze the active screen and generate a list of warnings. If you click on an individual warning, the inspector will highlight the problematic element on your simulator screen in yellow. It will also provide a detailed description of the violation and offer a suggested fix.
Common issues flagged during an audit include:
- Unlabeled interactive elements, which are completely useless to screen reader users
- Clipped text, which occurs when text fails to scale properly within its container
- Text size issues where font scaling is restricted
- Poor color contrast levels that make text unreadable
While the automated audit is incredibly helpful, it cannot replace manual testing. That is why the Inspector Tab includes a VoiceOver Simulation tool.
By using the navigation controls in the Inspector Tab, you can step through your app element by element, exactly like a VoiceOver user would. The inspector will even provide simulated audio feedback, reading the labels, traits, and hints aloud. This allows you to verify that the reading order is logical and that your content flows naturally from top to bottom.
For a practical demonstration of how Apple engineers use these features to fix real world bugs, you can watch the Accessibility Inspector: WWDC19 Videos.
How to Use the Color Contrast Calculator and Settings Tab
Color contrast is a critical component of visual accessibility. If your text color is too similar to your background color, users with low vision or those using their devices in bright sunlight will struggle to read your content.
The accessibility inspector iOS tool includes a built in Color Contrast Calculator to help you solve this problem. You can open it by going to the macOS menu bar and choosing Window, then Show Color Contrast Calculator, or by using the keyboard shortcut Option Command C.
The calculator allows you to use an eyedropper tool to sample the foreground text color and the background color directly from your app screen. It then calculates the exact contrast ratio.
Under WCAG 2.2 Level AA guidelines, the minimum contrast ratio for standard text must be at least 4.5 to 1, and large text must have a ratio of at least 3 to 1. The calculator features built in sliders that let you adjust the colors in real time. This allows you to find a compliant color palette that meets WCAG 2.2 standards without ruining your app’s visual design.
Once you have verified your colors, you can head over to the Settings Tab to test how your layout handles system level visual changes. The Settings Tab lets you toggle several options instantly:
- Bold Text: Check if your custom fonts support bold weights properly
- Reduce Motion: Verify that your app disables fast animations and transitions for users with motion sensitivity
- Invert Colors: Ensure your images and custom views do not look distorted when smart inversion is active
- Dynamic Type: Use the slider to increase the system font size to its maximum level. This is the easiest way to check if your text scales smoothly or if it gets clipped and runs off the screen
By testing these features in the Settings Tab, you can quickly identify layout bugs and ensure your app conforms to WCAG 2.2 Level AA requirements.
Simulator Testing versus Real Device Testing
When you are testing your app for accessibility, you might wonder whether you should use the iOS Simulator or a physical iOS device. The truth is that both have their place in a professional testing workflow, but they offer very different experiences.
The iOS Simulator is incredibly convenient during active development. It is fast, does not require physical hardware, and allows you to quickly inspect views and run audits. However, the simulator has major limitations. It does not support native VoiceOver gestures, switch controls, or physical braille boards. Additionally, because you are navigating with a mouse and keyboard on a Mac, the simulator treats UI elements as desktop objects, which can sometimes alter the feedback you receive.
A physical device is the only place where you can perform true functional testing. Testing with actual touch gestures is the best way to verify touch target sizes and experience exactly how a blind or low vision user navigates your application.
Here is a quick comparison to help you understand when to use each environment:
- iOS Simulator Testing:
- Primary Use Case: Rapid debugging during active coding
- VoiceOver Support: Simulated via inspector navigation only
- Audit Capabilities: Full support via the Audit Tab
- Hardware Testing: No support for switches or braille displays
- Layout Verification: Excellent for checking Dynamic Type scaling
- Physical iOS Device Testing:
- Primary Use Case: Final validation and user experience testing
- VoiceOver Support: Full native screen reader with touch gestures
- Audit Capabilities: Supported on debuggable builds
- Hardware Testing: Full support for alternative input devices
- Layout Verification: Best for testing real world touch target sizes
For a deeper look at how to balance automated tools with manual device testing, you can read The Ultimate Guide to Online Accessibility Testing.
Frequently Asked Questions about iOS Accessibility Testing
Why are my accessibility identifiers missing in the simulator?
If you are using the accessibility inspector iOS tool and notice that your accessibility identifiers are missing, the most common reason is that the inspector is targeting your Mac computer rather than the simulator process.
To fix this, click the target selection dropdown in the top left corner of the inspector window and explicitly choose your running iOS Simulator from the list. Once the target is set correctly, scroll down to the Advanced group in the Inspector Tab. Apple groups accessibility identifiers under this section to keep them separate from the basic attributes used by screen readers, as identifiers are primarily used for UI automation testing.
Can I use the inspector for WCAG 2.2 compliance audits?
Yes, the Accessibility Inspector is an excellent tool for identifying WCAG 2.2 Level AA violations, but it cannot perform a complete audit on its own.
Automated audits are highly effective at catching technical errors like missing labels, restricted text scaling, and poor color contrast. However, they cannot evaluate subjective criteria, such as whether a button label actually makes sense in context. To achieve true WCAG 2.2 compliance, you must combine the automated audits of the inspector with manual testing using native VoiceOver on a physical device.
How does the inspector help with custom UI elements?
Standard UIKit and SwiftUI controls have built in accessibility, but custom views often appear as completely blank spaces to assistive technologies.
When you hover over a custom view with the inspector, you can see if it is recognized as an interactive element. If it is not, you must modify your code. For custom UIKit views, you must set the isAccessibilityElement property to true and assign a meaningful, localized string to the accessibilityLabel attribute. The inspector allows you to instantly verify that your code changes have successfully exposed the custom view to the system.
Conclusion
Using the accessibility inspector iOS tool is one of the most effective ways to build a high quality, inclusive mobile application. By integrating automated audits, attribute inspection, and contrast calculations into your daily development routine, you can catch and resolve critical accessibility issues long before your app reaches the App Store.
However, achieving full WCAG 2.2 compliance and protecting your business from ADA legal risks requires a comprehensive approach. At WCAG Pros, located in Norco, CA, we specialize in helping businesses navigate the complexities of digital accessibility. We provide page by page audits of all WCAG A and AAA points, deliver clear code fixes, and offer free re-audits to help you earn your compliance badge.
If you want to ensure your iOS application is fully accessible to everyone, we are here to help. Contact us today to learn more about our professional auditing services by visiting WCAG Pros Professional WCAG Audit Services.
Read more website accessibility articles
Get Help With Your Website
We'll follow up with info about:
- The process
- Cost
- Timeline
We promise to respect your privacy, and never abuse the information you provide. We will not sell or rent your information to any third party.
By submitting this form, you consent to receive SMS messages and/or emails from SEM Dynamics LLC, dba WCAG Pros. To unsubscribe, follow the instructions provided in our communications. Msg & data rates may apply for SMS. Your information is secure and will not be sold to third parties.